Displays
Philips Signage display 42BDL5057P
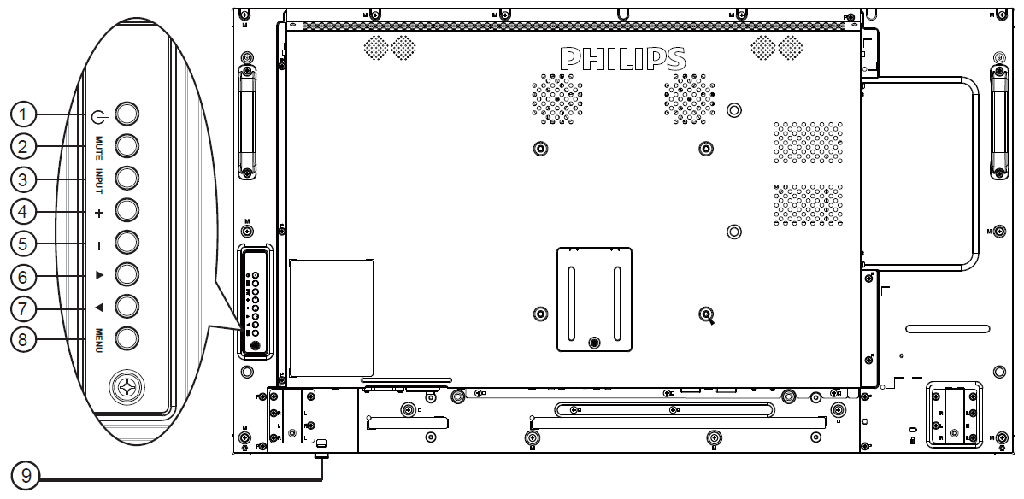
1 [ ] button
Use this button to turn the display on or put the display to standby.
2 [MUTE] button
Switch the audio mute ON/OFF.
3 [INPUT] button
Choose the input source.
4 [ ] button
Increase the adjustment while OSD menu is on, or increase the audio output level while OSD menu is off.
5 [ ] button
Decrease the adjustment while OSD menu is on, or decrease the audio output level while OSD menu is off.
6 [ ] button
Move the highlight bar up to adjust the selected item while OSD menu is on.
7 [ ] button
Move the highlight bar down to adjust the selected item while OSD menu is on.
8 [MENU] button
Return to previous menu while OSD menu is on, or to activate the OSD menu when OSD menu is off.
9 Remote control sensor and power status indicator
Receives command signals from the remote control
Indicates the operating status of the display without OPS: Lights green when the display is turned on Lights red when the display is in standby mode Lights amber when the display enters APM mode When {SCHEDULE} is enabled, the light blinks green and red If the light blinks red, it indicates that a failure has been detected Lights off when the main power of the display is turned off
Input/Output Terminals
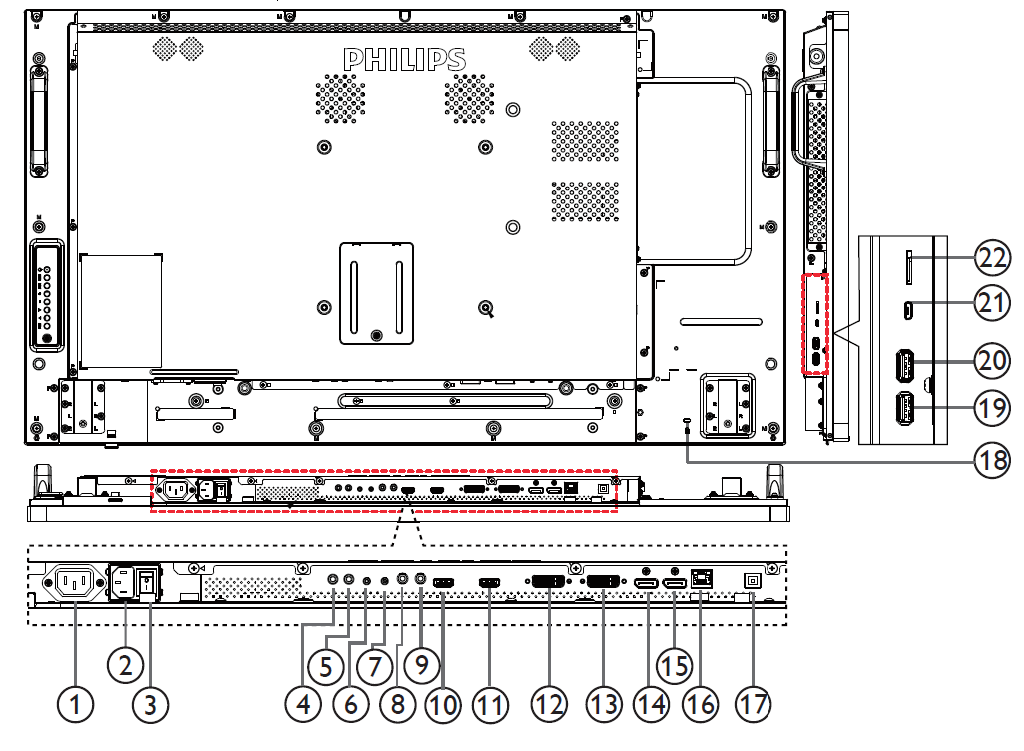
AC OUT
2 AC IN
AC power input from the wall outlet.
3 MAIN POWER SWITCH
Switch the main power on/off.
4 IR IN / 5 IR OUT
6 RS232C IN / 7 RS232C OUT.
8 LINE IN
9 AUDIO OUT
10 HDMI1 IN /11 HDMI2 IN
12 DVI-I IN
13 DVI OUT / VGA OUT
14 DisplayPort IN / 15 DisplayPort OUT
16 RJ-45
LAN control function for the use of remote control signal from control center.
17 USB PORT
Connect your USB storage device.
18 SECURITY LOCK
Used for security and theft prevention.
19 USB PORT B
Connect your USB storage device.
20 USB PORT A
21 MICRO USB
22 MICRO SD CARD
Remote Control
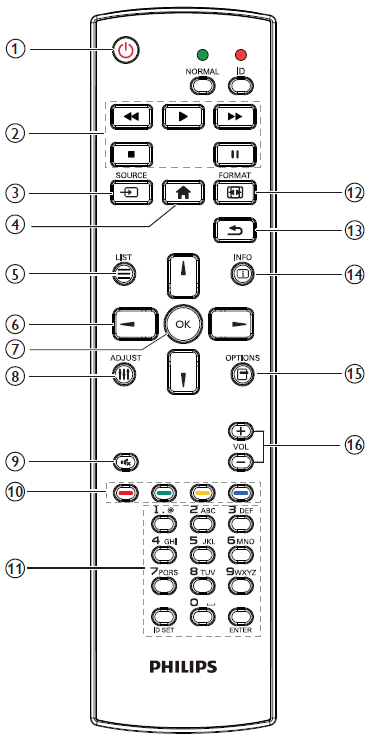
1 [ ] POWER button
Power ON/OFF.
2 [PLAY] buttons
Control playback of media files.(for Media Input only)
Freeze feature
Pause: Freeze hot key for all inputs content.
Play: Unfreeze hot key for all input content.
3 [ ] SOURCE button
Root Menu: Go to Video source OSD.
4 [ ] HOME button
Root Menu: Go to Main Menu OSD.
Others: Exit OSD.
5 [ ] LIST button
No function.
6 NAVIGATION buttons
[ ]
Root Menu: Go to Smart picture OSD.
Main Menu: Move the highlight bar up to adjust the selected item.
IR Daisy Chain Menu: Increase controlled Group ID number.
[ ]
Root Menu: Go to Audio source OSD.
Main Menu: Move the highlight bar down to adjust the selected item.
IR Daisy Chain Menu: Decrease controlled Group ID number.
[ ]
Main Menu: go to previous level menu.
Source Menu: Exit source menu.
Volume Menu: Decrease Audio Volume.
[ ]
Main Menu: go to next level menu or set selected option.
Source Menu: Go to selected source.
Volume Menu: Increase Audio Volume.
7 [ ] button
Root Menu: Go to IR daisy chain OSD in Primary/Secondary mode.
Main Menu: Confirm an entry or selection.
8 [ ] ADJUST button
Go to Auto Adjust OSD for VGA only.
9 [ ] MUTE button
Toggle Audio Mute/Unmute.
10 [ ] [ ] [ ] [ ] COLOR buttons
Choose tasks or options.(for Media Input only)
[ ] Hot key for Window selection function.
11 [Number/ ID SET/ ENTER] button
Enter text for network setting.
Press to set the display ID..
12 [ ] FORMAT button
Change Image Zoom Mode [Full][4:3][1:1][16:9][21:9][Custom].
13 [ ] BACK button
Return to the previous menu page or exit from the previous function.
14 [ ] INFO button
Show Information OSD
15 [ ] OPTIONS button
No function.
16 [ ] [ ] VOLUME button
Adjust volume.